Audio Performance Transfer (APT) Process
Section Overview
The Audio Performance Transfer (APT) process is one of the major unique features of Revoice Pro.
This chapter describes in detail what the APT process does and how to set it up and run it.
 Topics include:
- Description of APT Process
- Lastest version updates
- Quick guide to Setting and Running an APT process in 3 or less steps
- Details of Selecting and modifying APT inputs and outputs
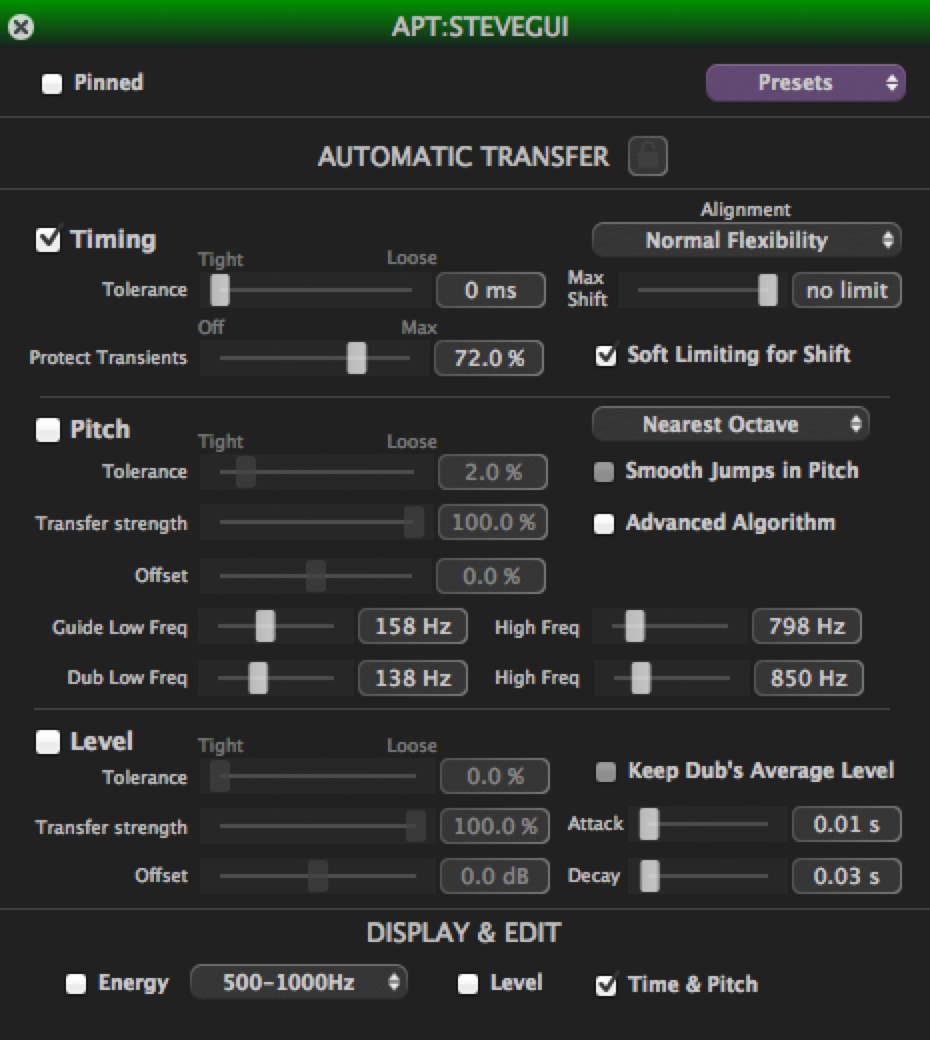
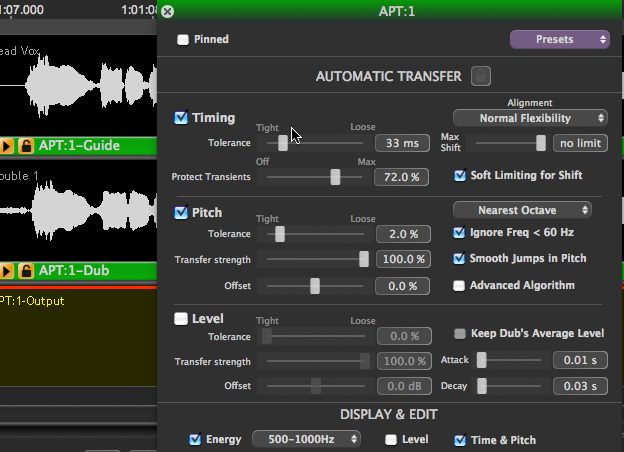
- Details of Adjusting the APT process control settings (shown right)
- Using process-dependent monitoring to efficiently audition the results
- Using one audio signal as the Guide input to multiple APT processes
Chapters after this one describe how to:
- Recognize and Fix APT processing problems
- Manually Edit APT Output (Timing, Pitch and Level)
- Export Processed Audio
For a text-based "Quick Start" approach without all the details, click here to go to the APT Quick Start Guide.
Click![]() to watch Video introductions or tutorials.
to watch Video introductions or tutorials.
Description of APT Process
- The APT process first determines the timing relationship between key features of the Guide and Target (Dub) signals using Synchro Arts' VocALign technology.
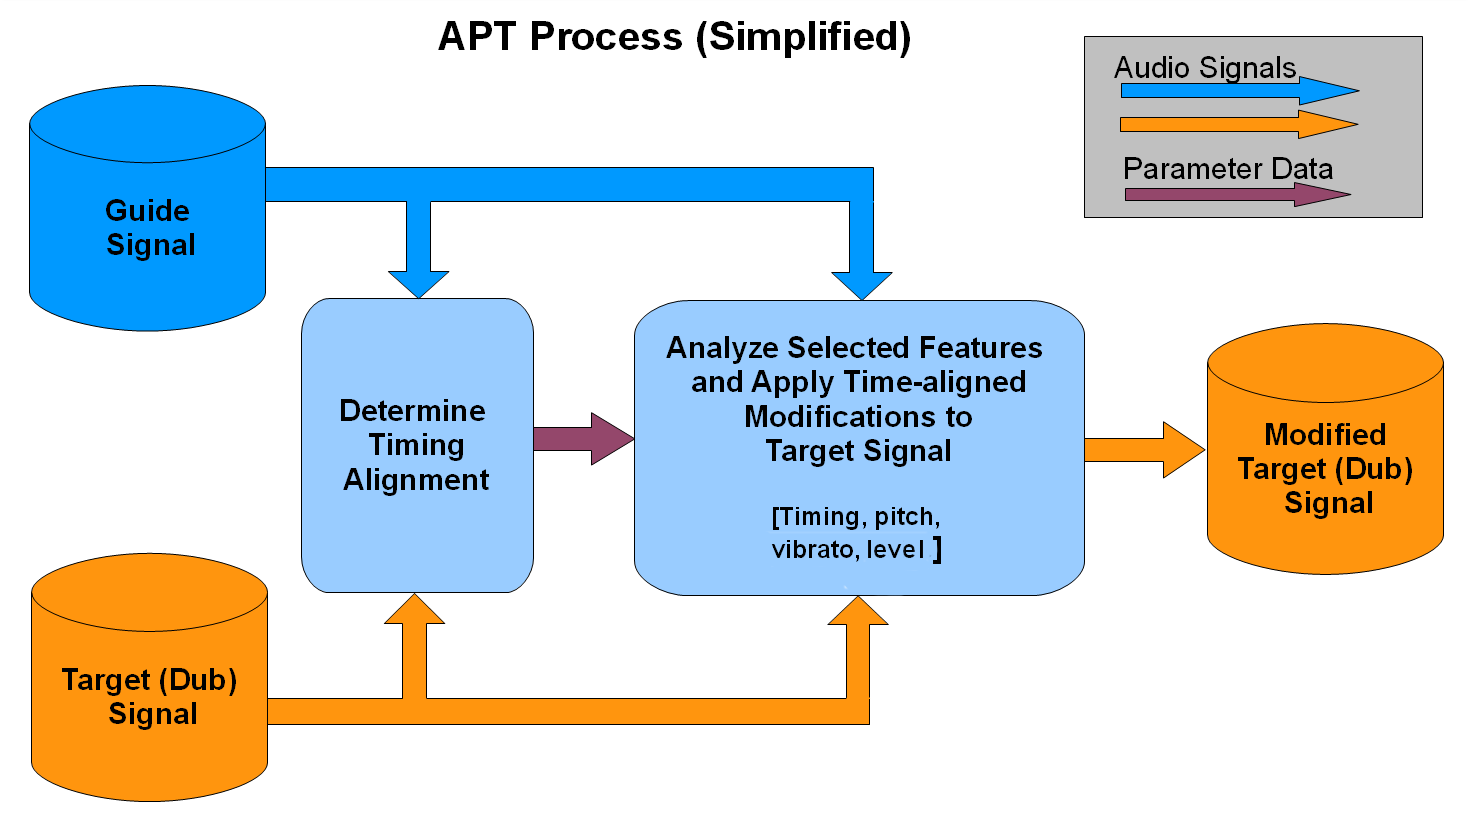
- Next, the process measures performance-related features (timing, pitch, vibrato and level) of both the "Guide" (which usually has certain preferred performance characteristics) and the Target.
- The user-selected Guide performance features are transferred to the Target to create a Modified Target signal with the selected Guide features.
- The transfer process usually includes the timing alignment, so Guide features are incorporated at precisely the correct places along the Target. However this is an option.
Related features:
- The "tightness" of the transferred feature can be controlled to allow natural acceptable differences to pass through unchanged.
- Optional user-inserted "Protected Regions" allow selected sections of the Target signal to be left unchanged.
- "Process-based" monitor switching, via single keys, provides instant comparison of inputs and outputs one or two signals at a time.
- The effects of any changes made to APT control panel parameters will be immediately visible (after rendering) in the displayed output graphics of pitch, level and waveform traces.
- The automatic APT processing can be followed by (or replaced by) manual editing of the output features.
Back to Index
Comments on the input signals to an APT Process
The track and time positions of the Guide and Dub waveforms
- As described above, the user needs to load into tracks in the Revoice Pro Session window at least one signal providing the Guide audio and one signal providing the Dub audio. For the examples below, we will show the simplest typical arrangement where the Guide is usually in Track 1 above the Dub in Track 2.
But it is important to understand that there are no fixed requirements for the locations of the Guide and Dub audio inputs to a process. In other words, which tracks are used, time positions of audio, or arrangement of tracks in the session is completely flexible. - Once the audio is loaded, it is convenient (but not necessary) to roughly line up the starts of the audio signals or the regions that you want to process, dragging one waveform if necessary.
How long a signal should you try to process?
Specifying the APT Input Signal Ranges
For efficient APT processing, it is sometimes better first to try processing sections of the Guide and Dub that are less than a minute long, and you can later experiment with longer sections as the procedure becomes more familiar.
One way you could do this is to load portions of the Guide or Dub signal waveforms together in sections say between 30 to 60 seconds and process these sequentially.
Another way is to load the whole of the Guide into Revoice Pro, then the Dub in manageable sections.
You can, of course, in Revoice Pro, split long lenthgs of the loaded audio waveforms into sections.
However, instead of editing the audio in Revoice Pro, quite often the two best approaches are to:
1) Load the entire Guide and Dub tracks, and use carefully positioned APT Process Control Blocks to process phrases or segments of the Dub and Guide together and output the processed audio as you go. This also allows you to set the Start and Ends of Guide and Dub APT Inputs to be different as required, as explained in detail in the rest of this chapter.
Or
2) Load the Guide and Dub track in sections efficiently using any of the the AU, VST3, Audio Suite or AAX Link plug-ins or the new Audio Suite "Quick" APT Pro Tools plug-in.
Latest Version - Important Updates to this chapter:
In Revoice Pro 2.5 three significant features were added to improve the APT processing workflow, but the user should still read this and the next Chapter to understand the processing issues:
1) A new faster way of processing multiple Dub tracks with one Guide.
2) The ability to extend or restrict the APT pitch processing ranges of the Guide and Dub.
How to Quickly Set up and Run an APT Process
Setting up a new APT process and creating and hearing the Output signal can now take as few as 2 key strokes and uses a New Process window that can remain on the screen.
If Revoice Pro has automatically correctly selected the right process, the right input and output tracks and processing range, then all the user has to do is press the N key on the keyboard to create the N(ew) process, followed by the Space Bar to render the output and start playback.
Below we will first briefly explain these steps further. That is followed by more detailed descriptions of the steps and settings required, which the user needs to understand to know: a) how the automatic settings work; b) how to recognize when they need altering and c) how to alter them.
Input Audio Preparation
One way to cut down keystrokes when using Revoice Pro, is to load entire tracks of audio into Revoice Pro and then processes these in sections, working from the start towards the end. This generally works very effectively.
Alternatively, you can load audio in shorter, phrase-lenght sections, particularly if the signals differ so much that Revoice Pro cannot process the entire tracks successfully. It depends on the signals and the user's comfort with their own workflow.
However, using the methods described below to process sections that are less than minute in length helps you to check the audio carefully as you proceed through it. Plus, the same methods below can be applied to the whole length sometimes but it depends on the content of the tracks and the gaps and structure of the signals. In some cases, slightly different steps might be needed for longer signals or entire files. This is discussed later.
We start the instructions below assuming the input Guide and Dub signals are already loaded in Revoice Pro and that either the Guide or Dub audio waveform is selected (i.e. green) following being loaded.
Back to Index
Overview: Basic 3 Step APT Setup and Processing
Step 1 - Check the New Process settings and change them if necessary.
Firstly, if you do not see the New Process window (shown in the image below on the right), then you need to open it. To do this, make sure the Revoice Pro program is selected and press the B key on your keyboard. This will open the New Process window. Pressing the B key again will close it - but it is generally more efficient to leave this window open.
Note in the picture below that upon opening the New Process window, it has already automatically preselected all of the drop down menu items. We briefly explain each drop down option used in this first example, in which none of these settings will need changing.
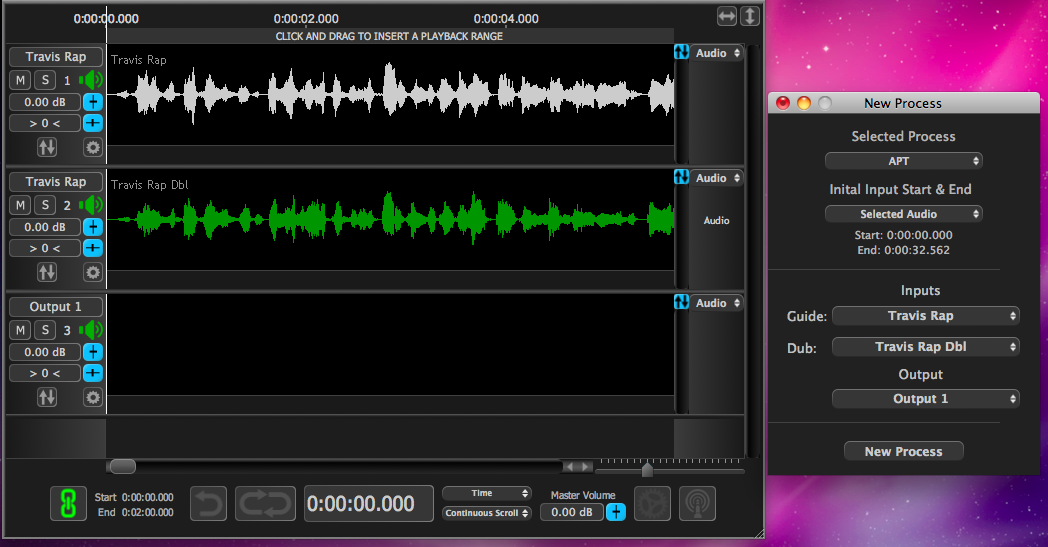
In the picture above, the Selected Process is correctly set to be an APT process. (The process type will remain set to what was previously selected until the user changes it).
Using Selected Audio to create a New Process
Under Initial Input Start and End, the New Process window has correctly chosen the Selected Audio (which is the audio shown in green) from start to end.
Alternatively, if the user prefers to process a section of the audio instead of the entire selection, a Playback Range can be quickly inserted that will set the start and stop of the Guide and Dub. Often, this is actually often the best method to use and is described here after we complete the current example using the Selected Audio range.
Under Inputs, the Guide and Dub tracks have also been correctly selected to be the first and second tracks, respectively. And lastly, under Output, the third track, Output 1, has been selected.
If these Input and Output track assignments need changing, further details are given here.
Step 2 - Create the Process with the selected settings - Press "N" key
Since the settings are set up correctly, we can now create the APT Process. If Revoice Pro is the selected program, simply press the N key on the keyboard. Or press the New Process button at the bottom of the New Process window.
In this example, this action will insert the green (selected) APT:1-Guide and APT:1-Dub Process Control Blocks (as shown in the picture below) into the Process Control Tracks (below each corresponding audio waveform). These show where the processing will start and end.
Also, a red line will appear in the Output 1 track, showing where the output audio of the process is ready to be rendered.
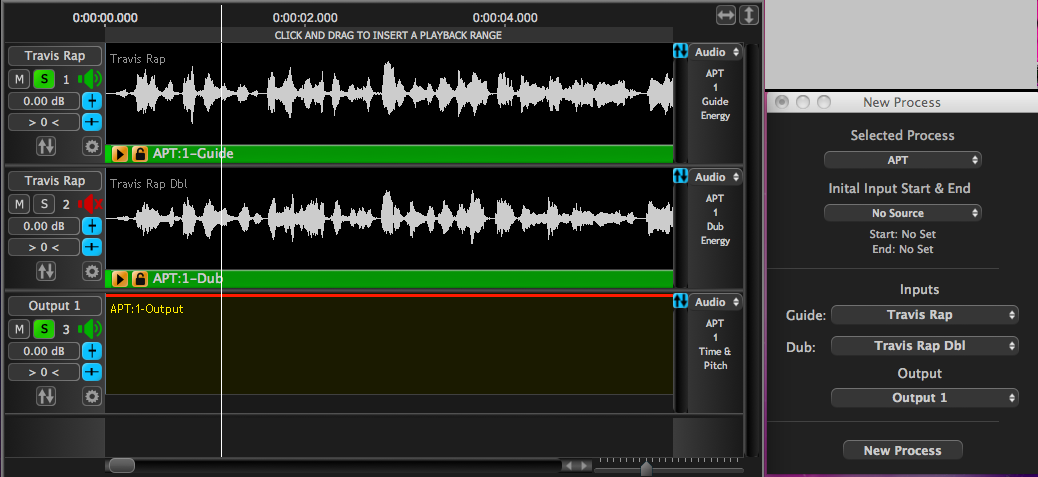
If these settings are not correct in any way, the user can use CMD Z (Mac) or CTRL Z (Windows) to remove quickly the process and then change the setting (described below) and re-create the process with the corrected settings. Other means for changing things will be given here.
Optional Step - Check and adjust the APT Processing Settings
If the APT Process settings are known to be set as required, you can go to Step 3. However, to inspect and change settings in the APT Process Control Panel, if the APT process Guide or Dub is selected (green), press the P key on the keyboard to open the Control Panel as shown below. Make any required adjustments and then press P again to close the panel. (More detail on this Control Panel is given here.)
Back to Index
Step 3 - Process and play the Output audio - Press "Space Bar"
Because this last Step will process and automatically play the audio, you can save time by Soloing the output track(s) you will want to hear first. To enable hearing the track with:
- The "Aligned" Output (in Track 3 -"Output 1") on its own - press the A Key.
- The Output signal with the Guide (in Track 1) - press the E key.
These and other process dependant track solo keys (fully described here) can also be pressed while playing audio.
Now, if the process settings look correct, press the Space Bar on the keyboard. This will " Run" the Process (and generate an Output such as the one shown below for this example) and automatically start playback through the Soloed tracks.
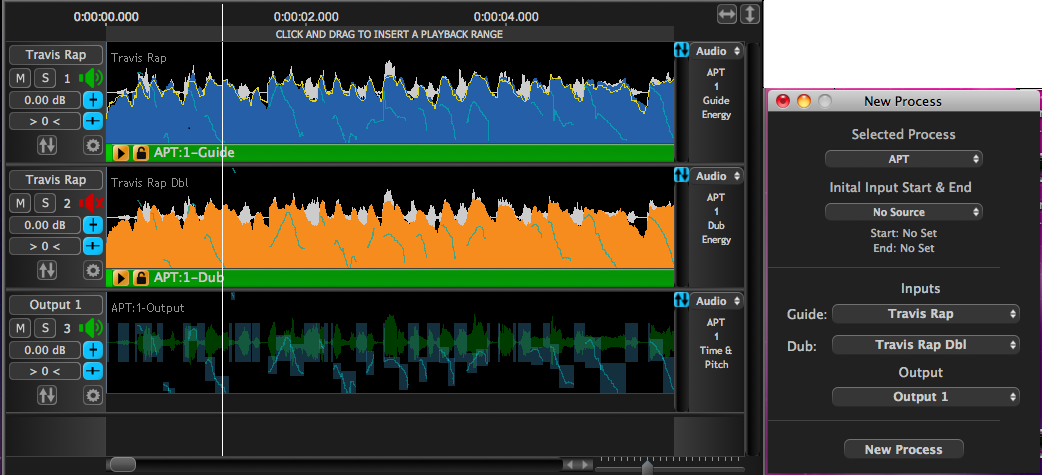
In track named Output 1, the dark green shows the output audio waveform, and the various lighter blocks and lines show the time-adjusted output measurements from the pitch measurement system.
Quite often, the above steps will provide a satisfactory result with little or no further effort, apart from transferring the output audio to your DAW or a file.
That completes the basic APT operation sequence using the Dub signal length ("Selected Audio") to set the range.
Setting an APT Range using the Playback Range
We next briefly describe using the Playback Range function to set the APT Processing Range (and also the range for playing the result). This will often be the most efficient method to use because it lets the user work quickly through the signal in sections, checking the results as you go.
To set one end of a Playback Range, simply hold down a mouse LEFTCLICK in the Playback Range Track (shown at the top of the screen in the examples pictured) and drag the yellow bar which appears to the right to set the end (or left to set the start) of the range.
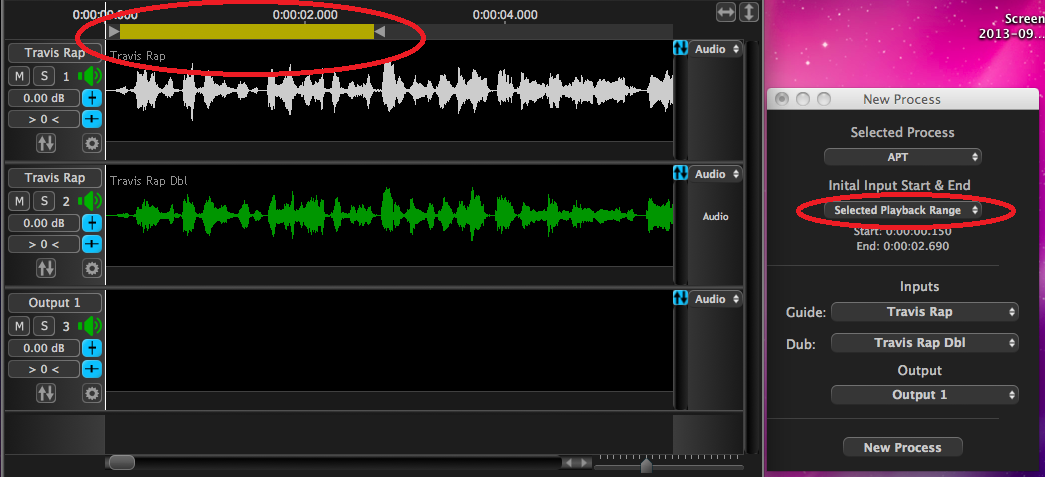
This action will automatically set the Initial Input Start & End control (in red) in the New Process window to show "Selected Playback Range".
If further adjustments to this range are needed, drag the end triangles of the Playback Range bar.
Once the Playback Range is set, then the same Steps 2 and 3 as described previously can be followed. However, we will explain below what the differences from the previous example are.
Back to Index
Create the Process using Playback Range
If the New Process window shows the Input tracks are set correctly, simply press the N key (or the New Process button). This inserts the Process Control Blocks and reserves the output as shown below by the named output signal "APT 1-Output" under the red line..
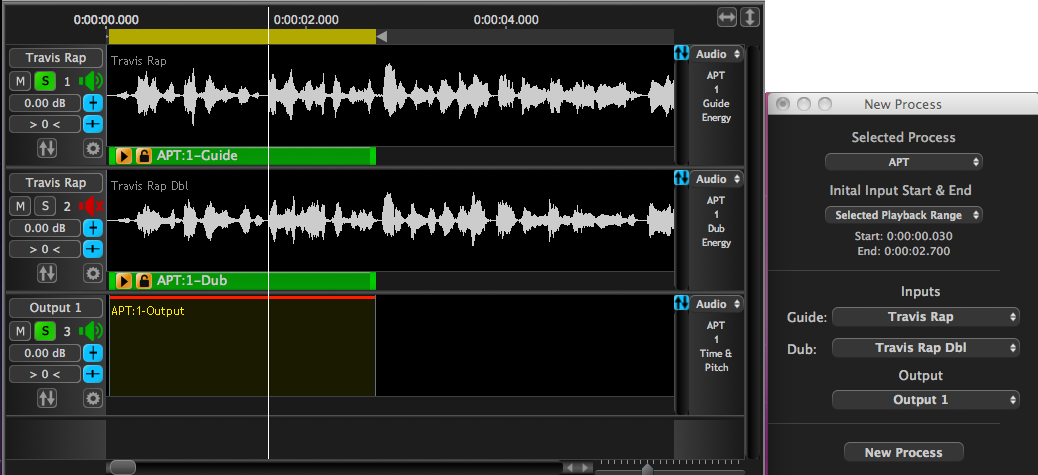
At this stage, if required, the ends or positions of the Guide and Dub Process Control Blocks can still be adjusted together (holding the Shift key down) or independently if required.
NOTE: The APT's process settings (in the Process Control Panel) will be initially set to the User Default Preset settings. So, as before, the APT Process settings can be inspected by pressing the P key and adjusted if required. (To save and resuse the new settings, save them as the "User Default Preset" in the APT Preset menu).
If the APT settings are OK, then you can optionally set the track solo switches now, and press the SPACE BAR to process and play.
In this example, Revoice Pro would show the processing results shown below with the output audio selected, play the Input and Output, and be ready to transferred the processed audio to your DAW.
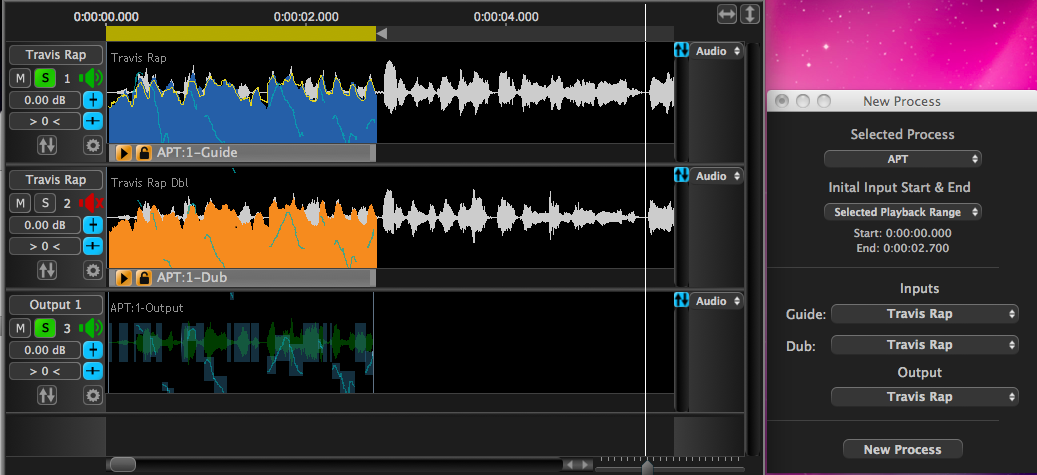
Move Playback Range and Create next Process
To process more sections along the same tracks, we can create another playback range and do the same procedure as before. However, we will now explain a simple technique to quickly make the next Playback Range start exactly where the last one ended.
To do this, simply hold down a LEFT CLICK on the triangle at the Start of the current Playback Range and drag to the End position for the next Playback Range. This drag path is shown below by the red arrow.
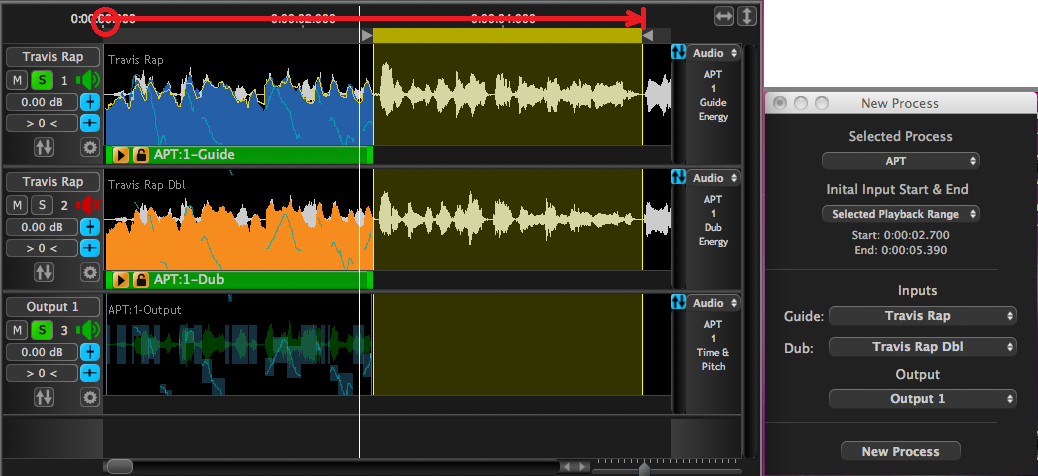
Pressing N followed by pressing the Space Bar will create and play the next processed output as shown below.
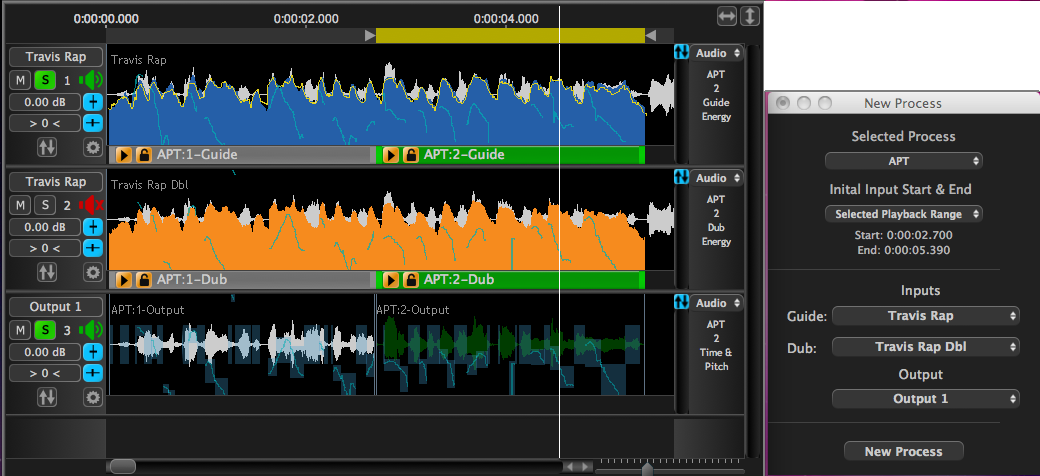
Once again, this would use the User Default process settings. We explain below an alternative method of applying different settings used in a previous Process.
Summary of Basic APT Process steps
To recap, in many cases when the selected Process settings and Input and Output Tracks are correct, the only change needed to be made is to set the Initial Input Start & End of the process to the next section of audio to process. The two main ways to set that automatically are to either use the whole of the "Selected Audio" or use a "Playback Range".
When the input signals' ranges are set, simply pressing N creates the process and pressing the Space Bar runs the process to create the output and starts playback.
Of course, there will be times when the processing settings need to be adjusted and the signals re-processed automatically, or even manually. Details of these further operations, refinements and options will be given next.
Back to Index
APT Processing - Further Details
Each APT process requires a Guide signal and a second input signal (Dub) that is being modified to match the Guide. These input signals come from audio signals loaded into tracks in a Revoice Pro Session window and which are displayed as named waveforms.
When setting up an APT process, the user needs to specify:
- That the "Selected Process" is an APT process
- Which tracks the Input Guide and Dub are in ("Inputs")
- Which track the Output should go to ("Output")
- What are the ranges of the Guide signal and the Dub signal
- What are the APT process settings (Process Control Panel)
As described in the previous sections, Revoice Pro chooses these settings for you automatically when you have done the same processing previously, and when you set a Playback Range or create new tracks.
But there are many times these settings will need to be altered, so we will go through these controls for doing that in more detail below.
Note: There are also older, alternative ways to set the Process Control Block ranges that were used in Revoice Pro V1 and V2. Because these are still operational but less efficient, we describe them at the end of this section here.
Selecting the APT Process
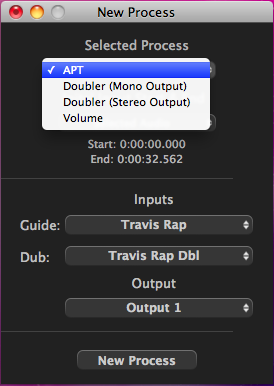
After processing other APT processes, the New Process window (as shown left below) will have APT under "Selected Process". If it doesn't, the user can change the process selection using the drop down control, as shown below right. The rest of this example will be based on having selected "APT" as the Selected Process.
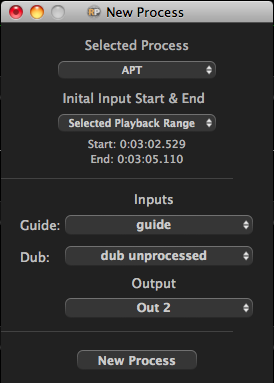
Selecting Input and Output Signals
What is a Process Control Track?
In a Revoice Pro Session window, the "factory" default session has 3 tracks, but there can be as many tracks as the user wants. This raises the question of how to tell an APT process which tracks are providing inputs and which track is receiving the output. Also, how do we specify and restrict the range of audio the user wants to process through a particular APT process?
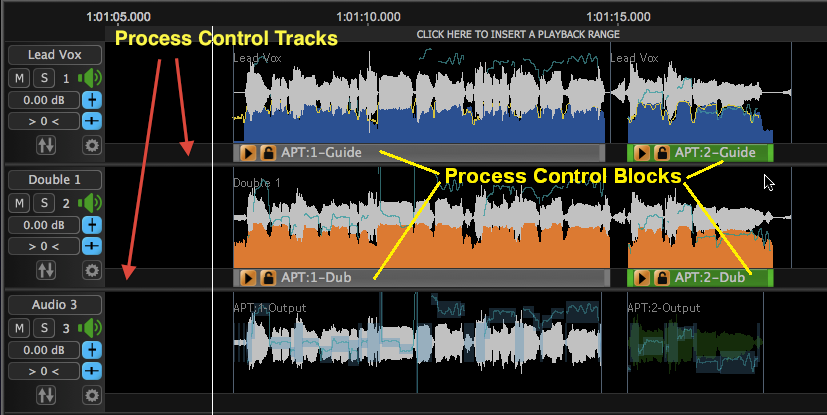 In Revoice Pro, the answer to all these questions information is supplied by Guide and Dub "Process Control Blocks".
An APT process is informed of your choice of tracks and the start and end of the input audio signal's range by inserting Process Control Blocks (with labels such as "APT:1-Guide", "APT:1-Dub" etc.) into Revoice Pro's Process Control Tracks, which are located just below each corresponding audio track, as shown in the picture.
There are simple and fast ways to set the input Guide and Dub processing ranges by making selections that automatically specify Process Control Blocks parameters. Some of methods were described in previous sections.
Although the use of Process Control Blocks is deliberately unusual in design, it is a flexible and powerful approach because an unlimited number of Process Control Blocks can be inserted along each track. What's more, they can overlap and stack. This means one track section can, for example, provide the input Guide signal for multiple Dubs in different tracks using multiple APT processes. Also, as mentioned previously, the Guide and Dub Process Control Blocks can start and end at different times, which has useful applications; for example, when the events along the time-line are at slightly different places, or a guide signal is noisy or reverberant. This is discussed further in the next chapter.
Each Process Control Block shows you at a glance:
- The Tracks and locations (start, stop and duration) of the input signals to a process;
- The Type of process and ID number (e.g. APT:1, or APT:4);
- The Control Block's role in the Process, i.e. "Guide", "Dub", (or "Input"- when used in the Doubler process;
- The process's selection status: selected (green) or not selected (gray).
- A button that opens the Process Control Panel
 (or press P on keyboard);
 - A Process Lock button
 that, when enabled, will stop further automatic processing from taking place. This is to stop any optional manual edits from being overwritten.
Back to Index
Selecting the Range of the Input Signals
There are three options available to set the initial processing Guide and Dub inputs signal ranges.
- Use the range of Selected Audio (which will be green) to set both the start and end
- Use the range of a Playback Range to set the start and end
- Or use the Mouse Cursor position to set the starting point of a short range which can be adjusted later
Which methods are displayed in the drop down menu under "Initial Input Start & End" (shown below right) changes dynamically.

We will comment on when "Mouse Position" can be used in the next section.
In the start of this Chapter, we already explained how to use the "Selected Audio" and "Selected Playback Range" options to set the processing range.
Which of these options will be shown depends on whether these selections are available. In the event that no audio is currently selected (green), then the Selected Audio option will not appear. Similarly in the event that no Playback Range has been created, then the Selected Playback Range option will not appear.
To use the Selected Audio option, if the desired waveform isn't shown selected, LEFT CLICK the waveform and it should turn green as shown in the image above. [In some cases, you will need first to RIGHT CLICK on it to bring up the menu showing "Edit Audio" and select that option first and then make sure the audio is selected.
What is most important to understand is to know that which option is automatically selected and shown under "Initial Input Start & End" (in the New Process window) will depend on whether an Audio waveform, or a Playback Range was the last item selected.
Selecting an APT range with the Mouse Position
This option is only useful if the user wants initially to create very short Guide and Dub Processing Control Blocks on the screen that will need adjusting after creating. This is not likely to be the most efficient method, but it is included for keeping compatibility with previous versions.
The description for doing this has been moved to here, near the end of this chapter in the section on older techniques.
Back to Index
Selecting and changing the Input Tracks
APT Guide and Dub Input track selections will not change automatically, so the user will need to change these as required. To select the APT Input Guide track, LEFT CLICK the Guide drop-down menus under the label Inputs to display all the track names in the Revoice Pro session. Then LEFT CLICK to select the Track name that contains the audio you want to provide the Guide input to the APT process. If necessary, do the same to set the Dub Track input by using the drop-down menu for the Dub.
Once set, the Input track settings will remain on these selections until manually changed or a new Session is created.
In the example pictured below, "Dub 5" had been the selected Dub track for the previous process and the blue highlight shows that the new choice for the next APT Process' Dub Input will be "Dub 6".
Selecting and changing the Output Track
The Output track, unlike the Input tracks, will automatically change to any new track that is created in the Session, because often this is the reason for creating the new track. Because of this automatic switching, the user should always check the New Process Output selector shows the correct Track name before creating a process.
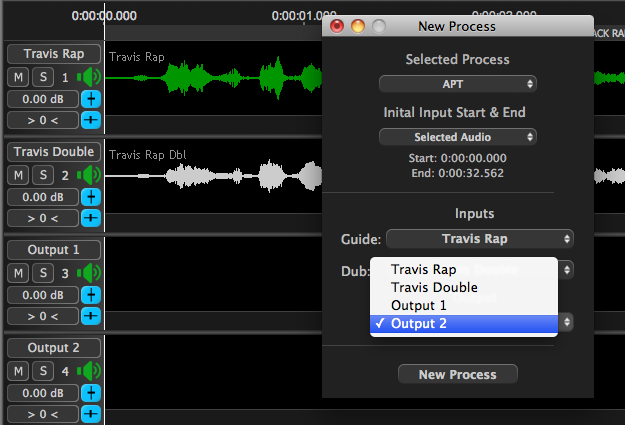
If the Output track needs to be changed before creating a process, to chose the new Output track, LEFT CLICK the drop down menu under the label Output in the New Process window. All the session tracks will be displayed. LEFT CLICK the required Track name to select the new APT process Output Track, as shown in the example pictured below where Output 2 is being selected.
What if you have selected a wrong Input or Output track?
Before creating a Process
Simply change the selections in the New Process Window.
After creating a Process
It is easy to change the Guide or Dub Input to an APT to another track: In the New Process window, LEFT CLICK the Guide or Dub Process Control Block so it is selected (green) and when the hand icon appears, drag the Process Control Block to the desired track (or new position). The start, end or position of any Input Process Control Block can also be adjusted. Once all the desired modifications are complete, press the Space Bar or the red Process Render button to create the modified output.
To change an APT Output Track selection, first create the Output audio by pressing the Space Bar. and follow the next instructions.
After creating the Output audio, drag the Output audio to the desired new Output track. To do this drag, RIGHT CLICK on the output audio and select "Edit Audio" from the pop-up menu. Then LEFT CLICK on the output waveform to select it (if it isn't already selected) so it is green, and then drag it to the desired new Output track.
Note: This drag of a process Output audio to a new track will set the Output for the next APT Process to go to this track. But this will be changed if a new Track is created in the Session.
Back to Index
Adjusting the Range of Existing Input Process Control Blocks
Why adjust the Process Control Blocks?
It is sometimes helpful and/or important to adjust the start, end or position of the initial APT Guide and Dub Process Control Blocks. The most common reasons are to:
- Set the process start closer to just before the actual start of the audio signal (for example to exclude digital silence)
- Avoid extraneous audio just before or just after the end of the audio you want to process.
Sometimes the audio referenced by the Guide and Dub Process Control Blocks does NOT start or end exactly at the same point of the timeline. This is allowed and expected - which is why the two blocks are independently adjustable.
It is also important to recognize that the APT process measures the noise floors of signals so it is usually ideal to try to have around 0.25 seconds of background audio before the actual signal of interest starts. But the processing will generally work even if this isn't the case.
Lastly, it is also critically important to make sure the range of the Dub Process Control Blocks extends through the full extent of the Dub audio signal. This is because it provides the audio that is modified to become the Output.
In contrast, the Guide Process Control Block can stop before the end of the Guide audio. This can sometimes help avoid including the effect of unwanted audio effects such as reverberation or noises at the end of the Guide signal. When a Guide stops before the Dub does, the selected Guide parameters will be used to modify the Dub until the Guide has run out, and then the remaining unmodified Dub will be attached to the end of the modified audio.
Making the adjustments
There are three simple ways to adjust the input Process Control Blocks. Before adjusting a Process Control Block, it must be selected (green) which can be done with a LEFT CLICK inside either of the the Input Process Control Blocks.
In each method below the Guide and Dub blocks can be independently adjusted. However, if you hold down the SHIFT key, both Guide and Dub blocks will be adjusted at the same time.
The three methods are:
 1. Drag Start or End
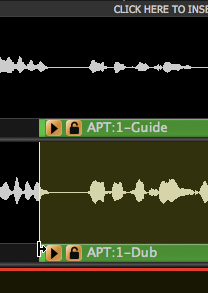
If you position the cursor at the start (or end) of a Process Control Block , the cursor will change to the Forward- (or Back-) pointing cursor (as shown right at the start of the Dub Process Control Block). This cursor indicate that the selected start (or end) can be dragged left or right with a LEFT CLICK held down. If the SHIFT key is pressed before LEFT CLICKing, then both the Guide and Dub Process Control Blocks' selected ends will move together.
2. Drag the entire Process Control Block
If you position the cursor inside a Process Control Block (away from the start and end), the cursor will change to the hand cursor as shown below, indicating that the Block (or Blocks) can be dragged with a LEFT CLICK held down.
In the image below, the Dub Process Control Block has been dragged to the left.
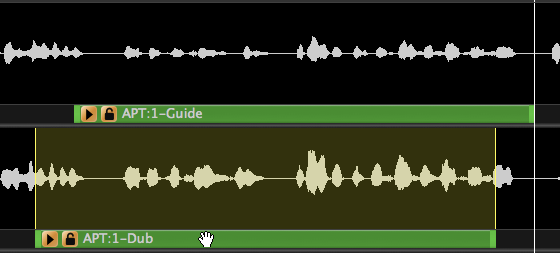
If the SHIFT key is pressed before LEFT CLICKing, then both the Guide and Dub Process Control Blocks will move together.
3. Set the Process Control Block Start or End to the Playhead Position
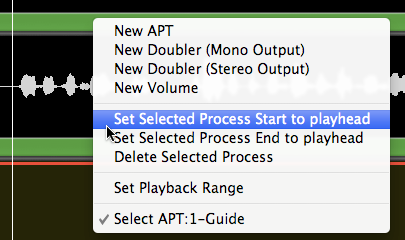 Position the playhead where you want a Process Control Block to start or stop, and then RIGHT CLICK either Input Process Control Block and use the pop-up menu shown right to set the start (or end) of the selected process to the playhead position.
Remember to Run the process after making any of these changes, which is most easily done automatically by pressing the Space Bar.
Back to Index
To read about:
- How to Get Audio Signals into Revoice Pro, click here
- How to Edit Audio Signals in Revoice Pro, click here.
Deleting an APT Process or its Output
If an APT process or its Output is not wanted, they can all be deleted together by RIGHT CLICKing on the unwanted APT Guide, Dub or Output Control Block and selecting from the pop-up menu: Delete Selected Process.
Back to Index
Modifying the APT Process Controls
There are two ways to open an APT Process Control Panel.
- If an APT Process Control Block is selected (green), pressing the P key will open the Control Panel (shown below) for the selected Process (this is the recommended method)
OR - LEFT CLICK on the Control Panel button
 in either the Guide or Dub Process Control Block.
 If the Pinned control is turned ON, the "pinned" panel will stay open. Multiple "Pinned" panels can remain open for comparison, but the Control Panel for the selected process will have a green-tinted name bar at the top.
To close the panel, either press the P key, or click the "X" button top left in the Control Panel, or click the ![]() button (once or twice - depending on what has been previously selected).
button (once or twice - depending on what has been previously selected).
Playback the Processed Output
The user can repeatedly try modifying the parameters in the Control Panel, and each time press the Space Bar to Render and Play.
If the playback is repeatedly looping by using a Playback Range and Loop switch, then after each adjustment, the red line above the output waveform will appear.
NOTE: If looping the playback, the user must press CMD R (Mac) / Alt R (Windows) keys (or the Render button) - to run the process to create the modified output signal. Then the new output signal will be played.
Preset settings can also be used, as discussed in the section here.
APT Control Panel Layout
The APT control panel shown above is divided into 3 main sections.
- Preset Control settings and Pinning control
- Automatic Feature Transfer controls (for Timing, Pitch and Level)
- Display and Edit-enable controls
The control sections (2) and (3) above are explained first in the chart below.
Back to Index
Using One Guide for Multiple Processes
It is simple to use one waveform as a Guide input to multiple APT and/or Doubler processes. This is typical, because you will often want all the double tracks and harmony tracks related to the timing (and/or pitch or level) of the same Guide.
Making this happen is explained using the example Session picture below with 6 tracks showing.
Here, the input waveforms are as follows:
- In the track numbered 1 and named "Lead Vocal" is the audio file "Morgan_Lead".
- In the tracks numbered 2 and 3 are two harmony vocal tracks to be used as "Dubs" and the tracks are named Harmony 1 and Harmony 2. These harmony files are called "Morgan Dble 1" and "Morgan Dble 2".
Click picture below to expand.
Using techniques described previously, three processes were created using the audio "Morgan_Lead":
- As a Guide input to APT:1
- As a Guide input to APT:2 and
- As an input to a Stereo Doubler (Dbl_S:1)
Two of the three input Processes Control Blocks are "stacked" under APT:1-Guide, but their names can be seen and selected from process pop-up list shown. This list appears by RIGHT CLICKing on the first Process Control Track (where "APT:1 Guide" is currently shown, because it is already selected in the list). If another input process name was selected, its Process Control Block would show on the screen.
The Dub inputs to APT:1 and APT:2 are shown in the tracks numbered 2 and 3 and named Harmony 1 and Harmony 2.
And finally, the Outputs have been created and sent to the following Tracks:
- The APT:1 Output for Harmony 1 is directed to the track named "Out-Harm 1"
- The APT:2 Output for Harmony 2 is directed to the track named "Out-Harm 2"
- The DBl_S:1 (Stereo Doubler) output from of the Lead vocal has been sent to the track with the Stereo waveform labelled "Out Lead Dbl".
In summary, the image above shows 3 output tracks, two with time aligned harmony parts and one with a synthesized double track. These processes all used the audio in the first track as an input to the different processes.
This bottom section of the pop-up menu lets us select which process comes to the "top" of the Process Control Bar "stack".
Another helpful indicator for which tracks are involved in a process is the "Enabled Item Display" at the right hand side of the Revoice Pro window, which will show all the contributing signals to a selected APT (or Doubler) process.
Displaying Overlapped Process Control Blocks
As shown in the example above, generally, because each signal or sections of a signal can act as an input to an unlimited number of processes, Process Control Blocks can overlap each other and sometimes become hidden.
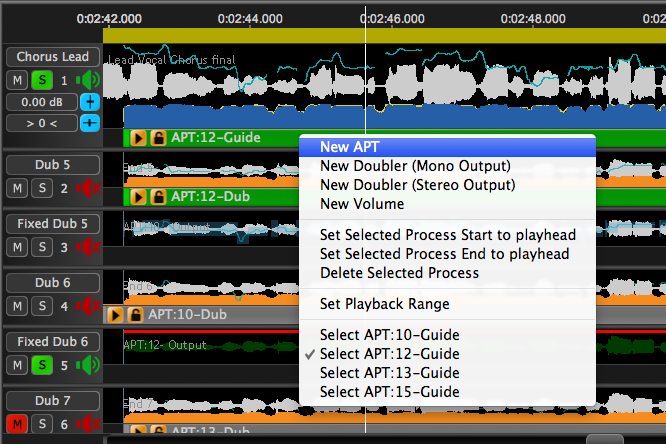 When this occurs, the user can select and display a "hidden" Process Control Block in one of two ways:
- RIGHT CLICKing a Process Control Track will pop-up a window that displays all the processes that are positioned where the user clicked - and selecting its name from the list will "pop it to the top of the stack" of processes, making it visible on the screen, and show it as selected. In the example shown right, four APTs use the Guide section shown stacked in Track 1 ("Chorus Lead") and APT:12 is shown selected at the top of the "stack".
- LEFT CLICKing a processes' Output signal waveform will also select and reveal that processes' Input (Guide and Dub) Process Control Blocks.
Auditioning the results
Auditioning the outputs and making comparisons with the inputs can be done quickly while adjusting parameters or when processing by following detailed instructions on:
A quick review is below:
- Optionally, set and adjust Playback Ranges in the Playback Range Control Track using LEFT CLICK and drag to the desired length.
- Delete the Playback Range if it is limiting setting the playback start position.
- Optionally enable Rewind and Loop controls if required.
- The keyboard Space Bar toggles playback start and stop and Renders the output automatically if required (and Preference set).
- The keyboard Up arrow and Down arrow step the playback head through audio events.
- Process dependant Soloing is available by selecting one of the APT Process Control Blocks and using the process-dependant Solo keys to Solo or Mute the various tracks.
- The APT control panel can remain open, the controls adjusted and processing run while signals are playing.
Back to Index
Understanding and Using APT Presets
The Presets system is used mainly to:
- Save and quickly load named combinations of settings that work well for the user and also
- Allow the same settings to be loaded automatically without having to repeatedly open the control panels.
When you first run the APT process, if you do not change the Settings when you run the APT process, the Factory "Default" Preset will be used. This may or may not give the results you want.
To change from the default settings - you need to open the APT Control panel and then you then have these options:
- Experiment and make your own settings by changing the sliders in the Settings section OR
- LEFT CLICK the Presets button
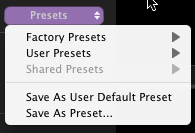 Clicking the Presets button in the APT Control Panel will bring up the menu shown right. If no User Presets have been saved, that entry would be greyed out, similarly to Shared Presets as shown.
Selecting Factory Preset will reveal a further list of named Setting plus a Default. These can't be changed by the user, but are generally good starting points.

If the user likes the results of a Factory Setting, they can select Save As User Default Preset, which saves the settings instantly as the User's Default Preset without opening any other window. That setting will be used in all further APT processing until a different Preset or settings is selected.
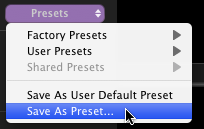 Similarly, if the user makes adjustments to the Setting Controls and finds a setting they wish to reuse on the next and further APT processes without opening the Control Panel, they can select Save as User Default Preset or Save As Preset if they wish to recall those settings in the future.
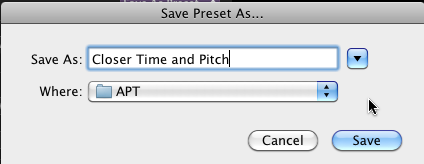
LEFT CLICKing Save As Preset opens the window shown below or a version with more file options.
You should then give the settings a distinctive name, for example "Closer Time and Pitch" as shown below, and it will appear next time you open the User Preset menu list.
Back to Index
Where APT Presets are stored
Mac OS
- An unlimited number of User presets are stored in the directory: (user)/Library/Application Support/SynchroArts/RevoicePro/APT
- Shared presets (i.e. those to be shared by ALL users of the same computer) should be moved from a User's directory to:
/Library/Application Support/SynchroArts/RevoicePro/APT
(Note: Administrator privileges may be necessary.)
Windows
Presets - Operational Features
- User defaults ("Save As user Default") are shared between Revoice Pro Sessions and running instances of Revoice Pro.
- Presets can only be removed from the lists by manually deleting the Preset file (with the same name as shown as the menu list) from the directory in which they reside.
Next Related Topics
- Recognizing and Fixing APT processing problems
- Manually Editing APT Output (Timing, Pitch and Level)
- Exporting Processed Audio
Alternative (older) Methods for Setting APT functions
The techniques described for completeness in this section still work, but are mainly superceded by more efficient methods described above. However, these could come in handy from time to time and therefore are worth understanding.
Selecting an APT range with the Mouse Position
To obtain the "Mouse Position" option in the APT menu, RIGHT CLICK in a Guide or Dub Process Control Track where you want the Process Control Blocks to START, and select "New APT" from the pop-up window shown below.
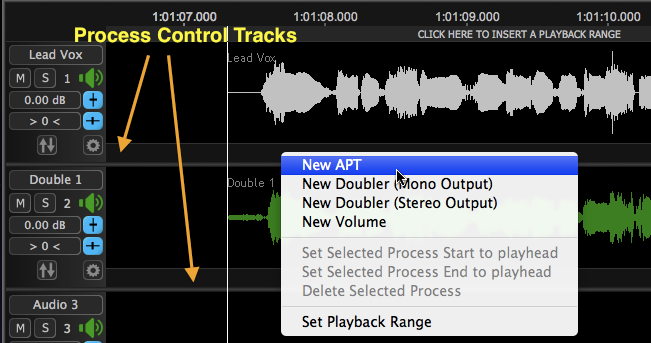
The New Process window (as shown below right) will show "Mouse Position" under "Initial Input Start & End". Next, press the N key (or the "New Process" button) to insert the Guide and Dub Process Control Blocks (shown in the example below as APT:10) which will start where the mouse was clicked when selecting "New APT".
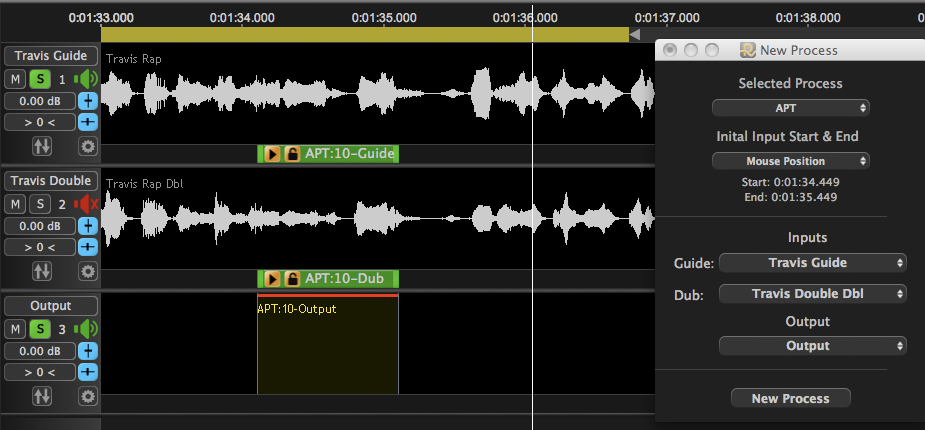
The user would normally then adjust the end and possibly the start of the APT Guide and Dub Process Control Blocks as required. Lastly, pressing the Space Bar will run the process, create the output, and start playback.
In addition, when Mouse Position has been previously used, the user can manually re-select "Mouse Position" using the pop-up menu in the New Process window as shown in the example below, even where there is also a Selected Audio waveform and a Playback Range available in the main window. The drop down choices at the right show that for the next New Process, the user can chose to use the "Mouse Position" again instead of the currently "Selected Audio".

Back to Index
Adjusting a Process Input Start or End to Playhead
As shown in the next image below, we have chosen "Selected Audio" so the APT Guide and Dub control bars were created in the whole tracks selected as well as a reserved Output range.
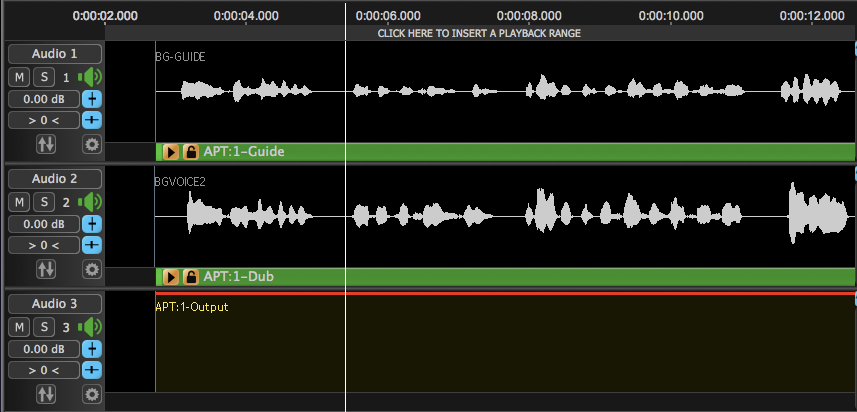
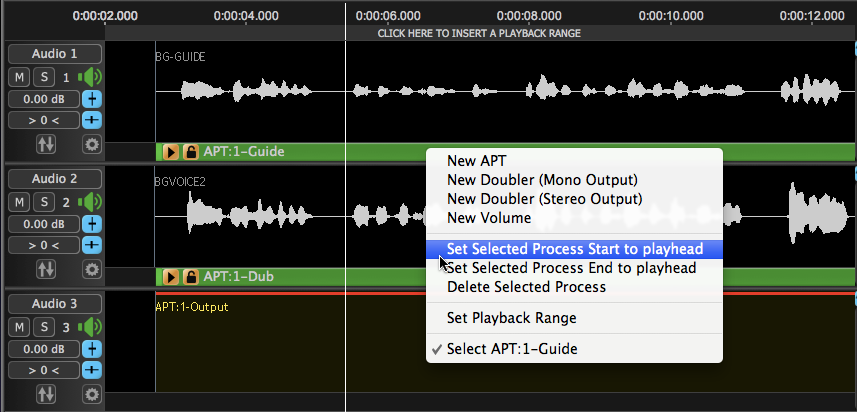
We can adjust the start and end of the APT Guide and/or Dub Process Control Blocks using the menu to set the ends to the playhead position.
- Set the Playhead at the start of the section to process.
- RIGHT CLICK the green APT Guide or Dub control bar and select Set Selected Process Start to Playhead. Holding down SHIFT key will adjust both Guide and Dub APT start points together, as shown below.
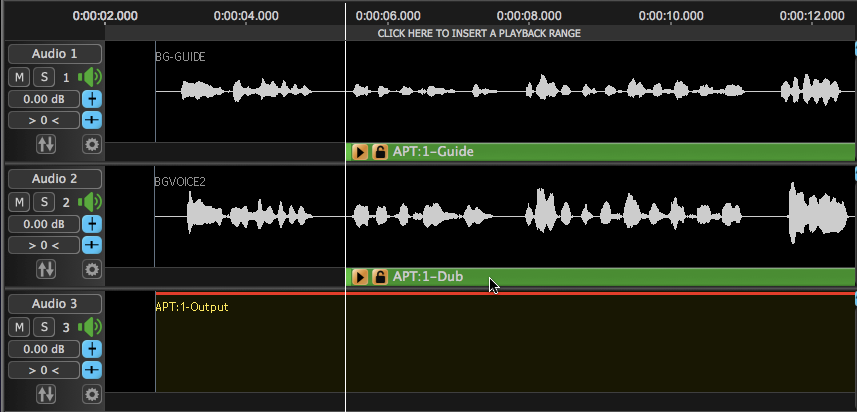
- Once the above command has been executed, the resulting APT Guide and Dub starts will be will look like this.
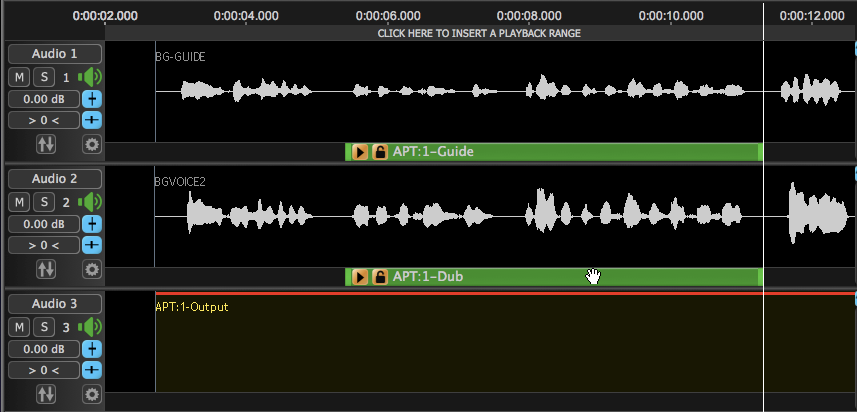
- The same procedure of positioning the Playhead at the end of a section, RIGHT CLICKing on an APT input and selecting Set Selected Process End to playhead while holding the shift key will set the end of the process inputs.
If the APT settings are known to be correct, normally, the next step will be to process the audio and play it. Pressing the Space Bar will do both.
You can also check and adjust the APT controls, which is described below.
Renaming Process Control Blocks
A part of the Process Control Block name (such as APT:1-Guide) can be renamed by the user by simply double LEFT CLICKing the name field and typing the desired new name.
For example if the user types in "Fred" into the APT:1-Guide or Dub name field, "Fred" will replace the "1". So, in this example the Guide will be renamed "APT:Fred-Guide", the Dub will be renamed "APT:Fred-Dub", and the Output will be renamed "APT:Fred-Output"


